
The Energy Cloud records every transaction performed at the charging stations and logs these transactions in the platform. This allows you to retrieve the start time, end time, duration, number of kWh charged, tariff, and the user involved for all transactions, as well as the applicable billing method (open, whitelisting, or roaming). An export of this overview can be generated from the platform for personal use. You can download the transactions per chosen month.
Steps required:
- If you want to download the transactions for your main organization, go to step 3. If you want to download the transactions for a sub-organization, go to step 2.
- Select 'Organizations' in the left menu and then select the sub-organization whose transactions you want to view by clicking on its tile. This will take you to that organization.
- Select 'Transactions' in the left menu and then select 'Overview' to view all transactions performed at the charging stations.
- Click 'Download data' to download a CSV export of this overview for the month you want, which you can then save.
- With a program like excel you can filter the fields within the csv file, for example you can filter for a specific charging station if needed.
Duplicates after merging monthly data
After exporting and merging the data, duplicates may occur. Transactions are filtered based on both start and end dates and can therefore appear in two different months.
This method is used because, in some cases, it is necessary to verify which part of a transaction belongs to which month. If we were to look only at the end date, the transaction would disappear from the month in which it started. Especially during a year-end transition, this information can be crucial to display in both months.
Using Excel, you can easily remove duplicates by filtering on the 'transaction ID' and 'timestamp' columns.
Steps: Removing duplicate data in Excel
Using the "Remove Duplicates" function, you can make your dataset unique again in just a few seconds.
Step 1: Preparation
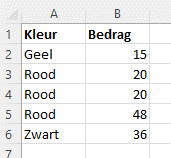
To start, select any cell within the data range you want to clean up.
To start, select any cell within the data range you want to clean up.
Step 2: Activate the function
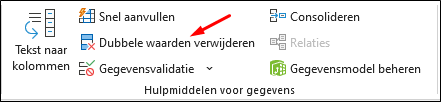
- Go to the Data tab in the top menu bar (the Ribbon).
- In the 'Data Tools' group, click the Remove Duplicates button. A settings window will appear.
Step 3: Determine what is unique
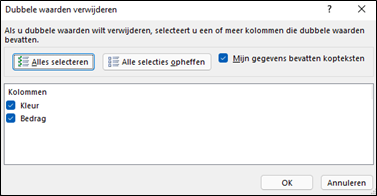
We recommend filtering by the 'transaction ID' and 'timestamp' columns. In the window that appears, you decide how Excel should recognize duplicate rows. You have the following scenario:
We recommend filtering by the 'transaction ID' and 'timestamp' columns. In the window that appears, you decide how Excel should recognize duplicate rows. You have the following scenario:
Scenario: Filtering by the entire row (combination)
- Goal: You only want to remove rows that are exactly the same.
- Action: Leave the checkboxes for all relevant columns selected (e.g., both 'Color' and 'Amount' in the example, or 'transaction ID' and 'timestamp').
- Result: Excel will only remove a row if the combination of all selected columns is identical to a previous row. For example, a row with "Red - €10" and "Red - €20" will both be preserved.
Step 4: Confirm
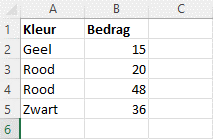
Click OK. Excel will execute the action immediately and display a pop-up with a summary: how many duplicate values were deleted and how many unique values remain.
Click OK. Excel will execute the action immediately and display a pop-up with a summary: how many duplicate values were deleted and how many unique values remain.